the software is mainly through the iPhone or iPad by connecting the corresponding WiFi. to control lighting, Instead of the traditional lamp switch button, and have diversified lighting control effect and any light color you wanted.
The software integrates three kinds of our company products:
1、WF100(Single point control): The main function is point to point control, that is, connected WiFi signal only corresponds to one lighting. The single point of lighting control is divided into three modes: 1>CDMode(RGB mode),2>CTMode(color temperature mode),3>DIMMode(signal color mode);
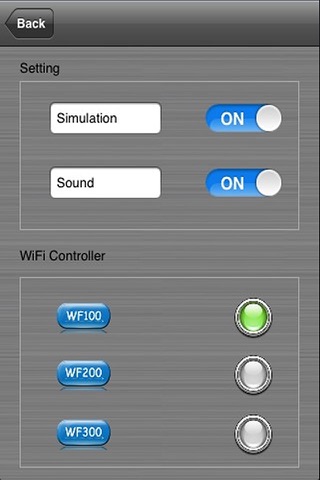
Running the software. Click the SETUP button and enter into the setting up interface, selected WF100 is to click the right button of WF100, and then click WF100 button, select one of the three mode, than return to the main interface, click “RUN” button, and enter into the controlling interface, the top right corner button is the switch button of the controller, the numerical value on top left corner is the current selected color value. The color can be changed by touching color disk in the middle. The lower right corner button is the mode changing button, the slider is to control the brightness of lighting, the left numerical value shows the value of brightness.
2. WF200(Multi-point control): The main function is to control more lighting or any one of the lighting. The principle is that the master WIFI controller transfer signal to the slave controller, the received controlling signal to decide integral control or distributed control.
Running the software, click the SETUP and enter into the setting up interface, selected WF200 is to click the right button of WF200, and then click WF200 button, select one of the three modes, and then have 0-F 16 Slave controller in total, can add the slave controller and name the slave controller as you like. The right side ticked icon, color green means selected the slave, color grey means non-select, the selected master can be showed on the controlling interface and the corresponding name. Return to the main interface, click the RUN button, enter into controlling interface, the numbers show on the top is the slave controller you ticked as green. Slip to the corresponding slave controller number will show the corresponding name. Slip to “All” means selected all of the slave controller, slip to others means to control the selected one slave controller. The top right corner button is the developing button of the equipment, the numerical value on top left corner means the color value you choose, you can choose the color by touching the middle color disk. The lower right corner button is the changing mode button, the slider is used to control the brightness of lighting, the left numerical value is the brightness value.
3. WF300(SPI control): the main function is to control different types of IC, the controlling point and LED Sequence is selectable, 83 modes are selectable in total.
Running the Software. Click “SETUP” button and enter into setting up interface, selected WF300 is to click the right button of WF300. and then click WF300 button The upon textbox is to input the IC numbers, the maximum IC number is 16-1024. The selecting place on the left side is LED sequence choose, the right selecting place to choose the IC type. Than Return to the main interface, click RUN button, enter into the controlling interface. The button on the top right corner is the developing button for the equipment, the top left corner button is the pause switch, the selecting place on the left in the middle is 83 mode, the right selecting place is to choose the speed. The slider is to control the brightness of lighting the numerical value is 1-32, and it also can change them fine adjustment by its two side buttons.
the videos as follow:
http://v.youku.com/v_show/id_XNDA3NzA5MzUy.html
http://v.youku.com/v_show/id_XNDA3Njk1NzY4.html
http://v.youku.com/v_show/id_XNDA3NzIwNTM2.html


